Caring for paintings is more than just keeping them out of harm’s way. Plenty of people think a quick dust and a good spot on the wall will do. But studies from professional conservators reveal that even something as subtle as humidity swings or a bit of sunlight can ruin a painting’s surface in a matter of months. The smallest oversight could end up costing you the art’s longevity or value.
Table of Contents
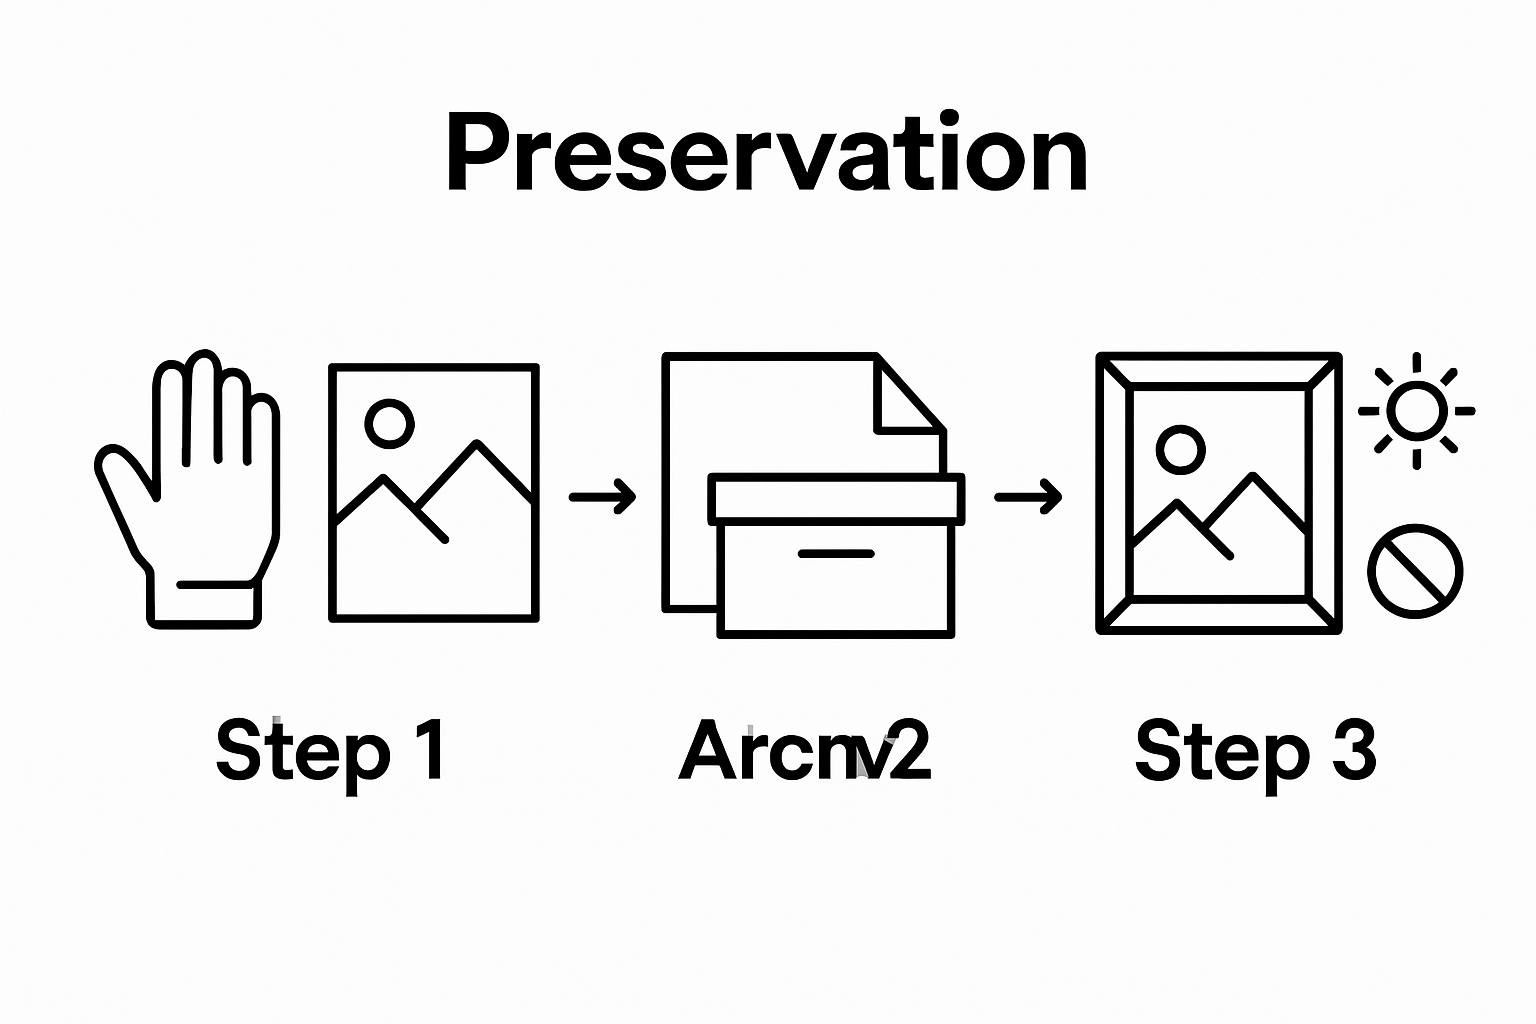
- Step 1: Assess The Condition Of Your Paintings
- Step 2: Gather Necessary Supplies For Preservation
- Step 3: Clean And Prepare The Surface Of Each Painting
- Step 4: Apply Protective Coatings Carefully
- Step 5: Store Or Display Your Paintings Securely
Quick Summary
| Key Point | Explanation |
|---|---|
| 1. Assess artwork condition thoroughly | Observe for signs of damage and environmental influences to establish a preservation strategy. |
| 2. Use high-quality preservation supplies | Gather archival-grade materials like acid-free paper and cotton gloves to protect artworks. |
| 3. Clean surfaces gently and carefully | Employ soft brushes and avoid moisture to prevent damage during cleaning procedures. |
| 4. Apply protective coatings meticulously | Use appropriate varnishes to provide a barrier against dust and UV light while ensuring even application. |
| 5. Store and display correctly | Maintain stable temperature and humidity, avoiding direct sunlight and heat sources to prevent deterioration. |
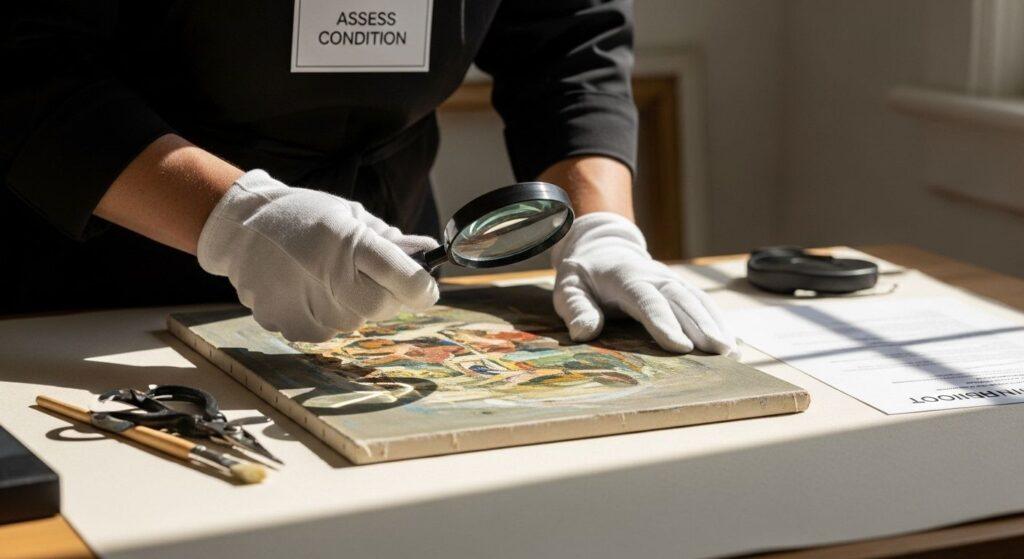
Step 1: Assess the Condition of Your Paintings
Before preserving your cherished paintings, understanding their current condition is crucial. Assessing a painting involves carefully examining its physical state, identifying potential damage, and determining the most appropriate preservation strategy. Professional art conservators recommend a systematic approach to evaluating artwork, which helps prevent further deterioration and ensures long-term protection.
Begin by preparing a clean, well-lit workspace with natural daylight or soft, indirect lighting. Wearing clean cotton gloves prevents oil transfer from your hands and protects delicate surfaces. Carefully remove the painting from its frame or mounting, handling it by the edges to minimize contact with the painted surface. Look closely for signs of damage such as craquelure (fine network of cracks), paint flaking, discoloration, or mold growth. Examine the canvas or support material for tears, stretching, or warping. Pay special attention to the edges and corners, where damage often first becomes visible.
Carefully inspect the painting’s front and back surfaces using a magnifying glass for detailed examination. Note any environmental damage indicators like water stains, dust accumulation, or evidence of insect activity. Check the painting’s varnish layer for yellowing or cloudiness, which can signal aging or inappropriate storage conditions. According to the Smithsonian Museum Conservation Institute, humidity fluctuations and direct sunlight exposure are primary contributors to painting deterioration. Take detailed photographs of any damage or unusual characteristics to document the painting’s current state. If you discover significant damage or are uncertain about the painting’s condition, consider consulting a professional conservation expert who can provide specialized assessment and restoration recommendations.
Verify the painting’s condition by creating a comprehensive condition report that includes:
- Location and extent of damage
- Type of damage observed
- Potential causes of deterioration
- Recommended immediate preservation steps
This meticulous assessment forms the foundation for developing an effective preservation strategy, ensuring your artwork remains protected and maintains its artistic integrity for years to come.
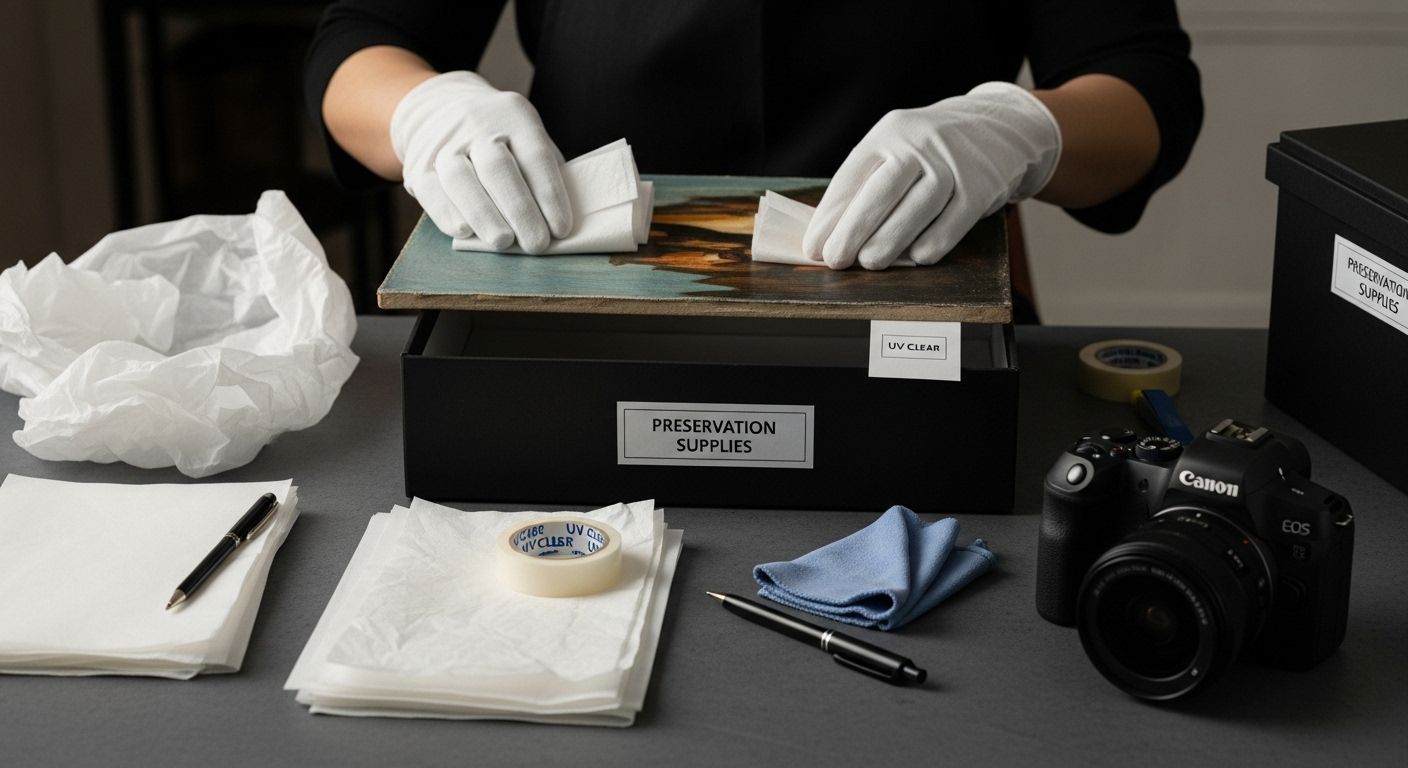
Step 2: Gather Necessary Supplies for Preservation
Successful painting preservation requires meticulous preparation and specialized supplies. Selecting the right materials is as crucial as the preservation process itself, protecting your artwork from potential damage and ensuring its longevity. Professional conservators recommend gathering high-quality, archival-grade supplies that create a protective environment for delicate artworks.
Start by assembling your preservation toolkit with precision. Cotton white gloves are essential to prevent direct skin contact, which can transfer oils and dirt onto the painting surface. Purchase museum-grade, lint-free cotton gloves that provide a clean handling barrier. Next, invest in acid-free archival tissue paper and backing boards, which create a stable protective layer around your painting. These materials prevent chemical interactions that could cause degradation. Acquire a soft, clean paintbrush with natural bristles for gentle dust removal, ensuring it has no metallic components that might scratch the artwork. You will also need a neutral pH adhesive specifically designed for art conservation, UV-protective clear tape, and a soft microfiber cloth for careful surface cleaning.
For proper documentation and environmental protection, our comprehensive art preservation guide recommends additional essential supplies. Obtain a digital camera or smartphone with good resolution to document the painting’s condition before and after preservation. Acquire archival storage boxes made from stable materials like unbuffered archival cardboard or inert plastics. Include a humidity indicator card to monitor storage conditions, as fluctuating moisture can significantly impact artwork preservation.
Essential preservation supplies checklist:
- Cotton white gloves
- Acid-free archival tissue paper
- Neutral pH conservation adhesive
- Soft natural bristle brush
- UV-protective clear tape
- Microfiber cleaning cloth
- Digital camera or smartphone
- Archival storage box
- Humidity indicator card
Verify your preservation kit by cross-checking each item against this list, ensuring you have everything needed to protect your valuable artwork effectively. Remember, investing in high-quality preservation supplies is an investment in maintaining the artwork’s historical and aesthetic value.
Here is a table summarising essential preservation supplies mentioned in the guide, including their purposes and tips for use.
| Supply Item | Purpose | Special Tips |
|---|---|---|
| Cotton white gloves | Protect artwork from oils and dirt | Use museum-grade, lint-free for all handling |
| Acid-free archival tissue paper | Stable protective layer around painting | Prevents chemical degradation, use between surfaces |
| Neutral pH conservation adhesive | Safely mends and mounts artworks | Only use adhesives designed for art conservation |
| Soft natural bristle brush | Gentle dust removal from surface | Avoid synthetic or metallic bristles |
| UV-protective clear tape | Secures coverings while shielding from UV | Ensure tape does not contact painted area directly |
| Microfiber cleaning cloth | Careful surface cleaning | Use dry and only on frames or non-painted surfaces |
| Archival storage box | Long-term artwork storage | Made from unbuffered archival cardboard or inert plastic |
| Humidity indicator card | Monitors storage environment | Place inside storage boxes for accurate monitoring |
Step 3: Clean and Prepare the Surface of Each Painting
Cleaning and preparing a painting’s surface is a delicate process that requires patience, precision, and gentle handling. Professional art conservators emphasize the importance of understanding your artwork’s unique characteristics before attempting any cleaning procedure. This critical step removes accumulated dust, dirt, and potential contaminants without causing damage to the painting’s delicate surface.
Begin by setting up a clean, well-lit workspace with a soft, stable surface covered with a white cotton cloth. Put on your clean cotton gloves to prevent direct skin contact with the artwork. Using a soft, natural bristle brush with extremely gentle, directional strokes from top to bottom, carefully remove loose surface dust. Select a brush with soft, fine bristles and minimal static charge – synthetic brushes can create unwanted electrical attraction to dust particles. Work systematically across the painting, using light, consistent movements that do not press or drag against the paint surface. Pay special attention to corners and textured areas where dust tends to accumulate. If you encounter stubborn dust or debris that cannot be removed with a soft brush, do not attempt to scrape or use moisture. Consult our art conservation experts for specialized cleaning techniques specific to your artwork’s medium and condition.
For paintings with significant dust or potential surface contamination, consider using specialized tools designed for art preservation.
A compressed air canister held at least 30 centimeters away can provide controlled dust removal for delicate surfaces. Alternatively, use a museum-grade vacuum with a low-suction HEPA filter attachment and a soft brush nozzle, maintaining constant distance to prevent accidental contact. These methods require steady hands and extreme caution.
Verification checklist for surface cleaning:
- Surface appears visibly cleaner without disturbing paint layers
- No additional dust or debris remains after cleaning
- Original paint texture and color remain unaltered
- Cleaning process completed without applying pressure or moisture
Remember that not all paintings require extensive cleaning. Some artworks are more sensitive to intervention, and unnecessary cleaning can cause more harm than good. When in doubt, always seek professional advice from a qualified art conservator who can provide personalized guidance tailored to your specific artwork.
Step 4: Apply Protective Coatings Carefully
Applying protective coatings is a critical step in painting preservation that requires exceptional precision and understanding. Protective coatings serve as a barrier against environmental damage, preventing dust, moisture, and ultraviolet light from directly contacting the artwork’s surface. Professional conservators approach this process with meticulous attention, recognizing that an incorrect application can potentially cause more harm than protection.
Prepare your workspace by selecting a clean, dust-free environment with stable temperature and minimal air movement. Use a soft, lint-free cloth to create a smooth working surface, and ensure you are wearing clean cotton gloves to prevent direct skin contact with the painting or coating materials. Choose a conservation-grade varnish specifically matched to your painting’s medium – acrylic paintings require different protective coatings compared to oil or watercolor artworks. Select a varnish with UV-protective properties and archival-quality composition. When applying the varnish, use a wide, soft synthetic brush with natural bristles, holding it at a 45-degree angle to create smooth, even strokes. Work systematically from one edge of the painting to the other, applying thin, consistent layers without oversaturating the surface. Allow each layer to dry completely before considering a second application, which should only be done if absolutely necessary.
Explore our professional art preservation techniques for more advanced coating methods. Temperature and humidity play crucial roles in successful varnish application. Ideal conditions include a room temperature between 18-22 degrees Celsius with relative humidity around 50%. Avoid applying protective coatings in direct sunlight or near air conditioning units, as rapid temperature changes can cause uneven drying and potential surface damage.
Verification checklist for protective coating application:
- Varnish applied in thin, even layers
- No visible brush marks or pooling of coating material
- Surface appears uniformly glossy or matte (as intended)
- No bubbling, streaking, or discoloration observed
- Coating edges are clean and consistent
Remember that not all paintings require protective coatings. Some delicate or historical artworks might be better preserved through alternative conservation methods. When uncertain, always consult a professional art conservator who can provide personalized guidance specific to your artwork’s unique characteristics and preservation needs.
Step 5: Store or Display Your Paintings Securely
Secure storage and display are the final critical steps in preserving your artwork’s integrity and longevity. Professional conservators understand that environmental conditions play a more significant role in artwork preservation than many realize. Your painting’s survival depends not just on careful handling, but on creating a stable, protective environment that minimizes potential damage from light, humidity, temperature fluctuations, and physical threats.
When selecting a display location, avoid direct sunlight, heat sources, and areas with high humidity or temperature variations. Choose walls away from windows, fireplaces, air conditioning units, and radiators. If displaying your painting, use UV-protective glass or acrylic museum-grade glazing that filters harmful radiation while providing clear visibility. Mount paintings using secure, professional-grade wall anchors that can support the artwork’s weight, ensuring they are attached directly into wall studs. Space paintings at least 15 centimeters apart to prevent accidental contact and allow air circulation. For delicate or valuable pieces, consider professional art mounting techniques that provide additional protection and stability.
For paintings not currently on display, create a dedicated storage environment that mimics museum conservation standards. Use archival-quality, acid-free storage boxes with rigid sides to prevent bending or pressure. Store paintings vertically with adequate spacing between them, using protective interleaving materials like acid-free tissue paper or glassine to prevent direct contact. Maintain a consistent room temperature between 18-22 degrees Celsius with relative humidity around 50%. Avoid storing paintings in basements, attics, or areas prone to moisture, dust, or pest activity. Periodically inspect stored artwork for any signs of environmental stress, such as discoloration, warping, or mold growth.
Verification checklist for painting storage and display:
- Painting mounted securely on wall studs
- No direct exposure to sunlight or heat sources
- UV-protective glass or acrylic used
- Consistent room temperature maintained
- Humidity levels between 45-55 percent
- Storage area clean and free from potential contaminants
- Paintings stored vertically with protective interleaving
Remember that each painting has unique preservation requirements. Vintage, fragile, or historically significant artworks might need specialized conservation techniques beyond standard home storage methods. When in doubt, consult a professional art conservator who can provide tailored advice for your specific artwork’s needs and condition.
Keep Your Artwork Alive with Proven Supplies and Expert Advice
If you have ever felt anxious when spotting craquelure or worried about the effects of dust and sunlight on your cherished paintings, you are not alone. The challenge of keeping your artwork vibrant and damage-free is real for every crafter and artist. As highlighted in this guide, effective preservation is only possible when you use the correct, high-quality materials and proven techniques. It is time to give your art the protection it deserves and preserve its beauty for years to come.

Shop South Africa’s widest range of art preservation supplies only at Bluepea Online. Discover everything from acid-free tissue paper to conservation-grade adhesives, plus top-quality original paintings and creative kits to inspire your next masterpiece. Do not let your hard work suffer from poor storage or the wrong materials. Visit our art supplies store today for trusted products and expert support. Make your next step count—preserve brilliance, and give your paintings a future worth displaying.
Frequently Asked Questions
How can I assess the condition of my painting before preservation?
To assess a painting’s condition, inspect it for signs of damage such as cracks, flaking paint, or mold. Document any issues and consider consulting a professional conservator if the damage is significant.
What supplies do I need for preserving paintings?
Essential supplies for painting preservation include cotton gloves, acid-free archival tissue paper, neutral pH adhesive, soft natural bristle brushes, and UV-protective clear tape, among others. High-quality archival materials are crucial for effective protection.
What cleaning methods should I use for my paintings?
Use a soft natural bristle brush to gently remove dust. Avoid using moisture or harsh chemicals, and consult professionals for specialized cleaning techniques if the painting has significant contamination or is particularly delicate.
Why is applying a protective coating important for paintings?
Applying a protective coating helps shield a painting from dust, moisture, and UV light, which can extend the artwork’s life. Ensure to use a conservation-grade varnish suited to the painting’s medium for optimal safety.
