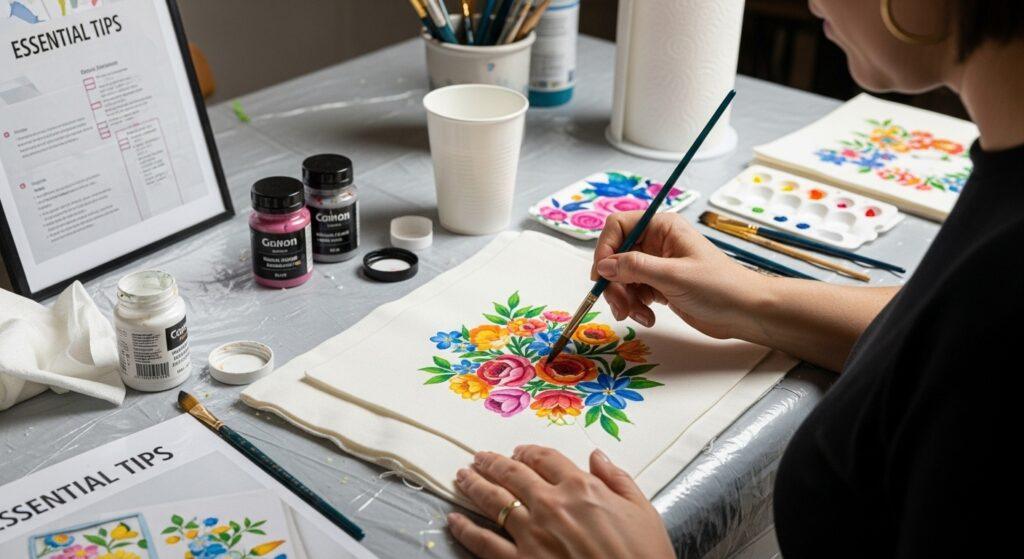
Fabric painting is taking creative projects to a whole new level, with artists and crafters gravitating towards textiles like cotton, linen, and silk to create stunning, long-lasting pieces. Surprisingly, not all fabrics can handle paint the same way, and natural textiles have been the top choice for centuries thanks to their superior absorption and texture. It might seem like just grabbing any old fabric will work, but your choice makes all the difference and could be the secret to artwork that truly stands the test of time.
Table of Contents
- Step 1: Choose Your Fabric Carefully
- Step 2: Prepare Your Workspace For Painting
- Step 3: Select Fabric Paints And Tools
- Step 4: Practice Your Painting Techniques
- Step 5: Test Your Design On A Sample Fabric
- Step 6: Heat-Set Your Artwork For Durability
Quick Summary
| Key Point | Explanation |
|---|---|
| 1. Choose natural fabrics for painting | Natural fabrics like cotton and silk enhance paint absorption, resulting in better quality artwork. |
| 2. Prepare fabric before painting | Washing and ironing fabric removes barriers to paint adherence, ensuring a smooth painting surface. |
| 3. Use fabric-specific paints for durability | Selecting fabric paint ensures color retention and flexibility, preventing cracking post-drying. |
| 4. Test techniques on practice fabric | Practicing with sample fabric helps refine techniques and understand how paint interacts with different textiles. |
| 5. Heat-set your artwork for longevity | Heat-setting bonds paint to fabric, transforming your artwork into a washable, durable piece. |
Step 1: Choose Your Fabric Carefully
Successful fabric painting begins with selecting the right textile foundation. Your fabric choice will dramatically influence the final artwork’s appearance, durability, and overall quality. Not all fabrics are created equal when it comes to accepting and holding paint effectively.
Natural fabrics like cotton, linen, and silk offer superior paint absorption and create stunning artistic results. According to the Getty Conservation Institute, these materials have been historically preferred by artists due to their unique textural qualities and paint receptivity. When selecting your fabric, consider its weave density, surface smoothness, and inherent flexibility.
Preparing your chosen fabric is equally crucial. Wash the fabric beforehand to remove any sizing, starches, or manufacturing residues that might prevent paint adherence. Use a mild detergent and avoid fabric softeners, which can create a waxy barrier. After washing, iron the fabric to create a smooth, flat surface that will provide an ideal canvas for your artistic expression.
While natural fabrics are ideal, some synthetic blends can also work well. Polyester-cotton mixes can provide decent paint retention if properly prepared. However, pure synthetic fabrics like 100% polyester might require special fabric painting mediums to ensure proper paint absorption.
Before committing to your entire project, always conduct a small test patch. Paint a small section of your fabric and observe how the paint spreads, dries, and maintains its color. This simple step can prevent potential disappointments and help you adjust your technique or choose a different fabric if needed.
Key fabric selection criteria include:
- Tight, even weave
- Minimal stretch or distortion
- Smooth surface texture
- Ability to withstand painting techniques
Remember that the fabric you choose will be the foundation of your artistic journey. Take your time, experiment, and select a textile that not only meets technical requirements but also resonates with your creative vision.
Here is a comparison table outlining how different fabrics handle paint absorption and what supplementary treatments or considerations may be needed for successful results, all based on the article information.
| Fabric Type | Paint Absorption | Special Considerations |
|---|---|---|
| 100% Cotton | Excellent | Wash and iron before use for optimal results. |
| Linen | Excellent | Smooth surface and tight weave preferred. |
| Silk | Very Good | Handle carefully, may require delicate painting. |
| Polyester-Cotton Mix | Good (if prepped) | Wash and test with sample patch before painting. |
| 100% Polyester | Poor | Needs special fabric painting mediums to work. |
| Synthetic Blends | Variable | May need extra priming or specific mediums. |
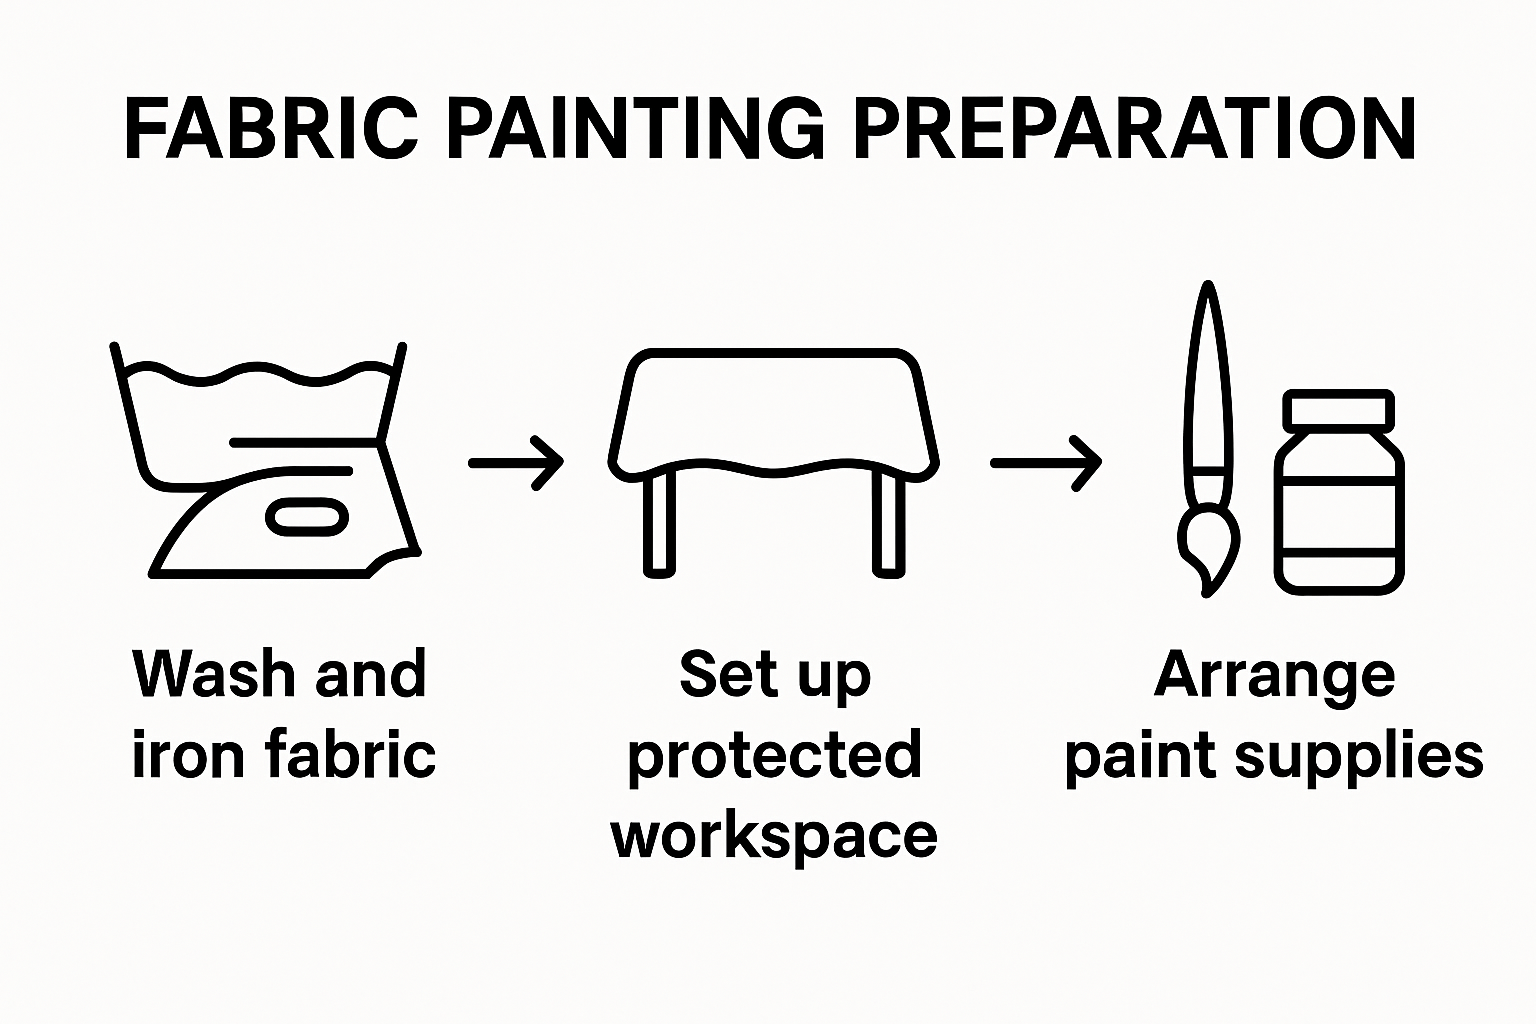
Step 2: Prepare Your Workspace for Painting
A well-organized workspace is the foundation of successful fabric painting. Creating an efficient and clean environment will help you focus on your artistic vision and prevent unnecessary complications during the creative process. Think of your workspace as your personal studio where creativity meets preparation.
Protect your work surface by covering it with a thick plastic sheet, drop cloth, or several layers of old newspapers. This prevents paint from staining your table or floor and makes cleanup much easier. Choose a surface that is completely flat and provides enough space for your fabric to lay smoothly without wrinkles or folds.
Gather all your materials before starting. You will need fabric paint, brushes, stencils, fabric medium, palette, water container, paper towels, and protective clothing. Arrange these items within easy reach to maintain a smooth workflow. If you want to learn more about painting techniques, consider having reference materials nearby.
Ventilation is crucial when working with fabric paints. Choose a workspace with good air circulation, preferably near an open window or with a fan to help paints dry quickly and disperse any potential fumes. Natural light is ideal for seeing true colors and detecting subtle details in your painting.
Dress appropriately for your painting session. Wear clothes you do not mind getting paint on, and consider using an apron or old shirt to protect your clothing. Rubber gloves can be helpful for keeping your hands clean, especially when working with vibrant or dark-colored paints.
Prepare a designated cleanup area with water, soap, and cleaning materials. Having this ready means you can quickly address spills or clean your brushes without interrupting your creative flow. Keep paper towels or old rags nearby for immediate wiping.
The following table provides a handy overview of essential tools and materials mentioned for fabric painting, including their specific purposes as described in the article.
| Tool/Material | Description/Purpose |
|---|---|
| Fabric-specific paints | Acrylic or textile paints designed for optimal colour retention and flexibility on fabric. |
| Synthetic brushes | Brushes in varying sizes for precise control and smooth application of paint on fabric. |
| Fabric medium | Mixed with acrylic paint to improve flexibility and adherence, preventing stiff or cracked fabric. |
| Stencils | Used to create crisp and repeatable patterns and designs. |
| Painter’s tape | Helps achieve clean edges and protects fabric areas not to be painted. |
| Textile markers | For adding fine details and outlining painted sections. |
| Palette & water container | For mixing paints and cleaning brushes during the painting process. |
| Protective clothing | Wear old clothes or an apron to safeguard against accidental paint stains. |
Key workspace preparation checklist:
- Flat, protected work surface
- All materials within reach
- Good lighting and ventilation
- Protective clothing
- Cleanup supplies ready
Taking time to set up your workspace properly will transform your fabric painting experience from potentially stressful to thoroughly enjoyable.
Step 3: Select Fabric Paints and Tools
Choosing the right paints and tools is crucial for creating stunning fabric artwork. Your selection will determine the vibrancy, durability, and overall quality of your final piece. Different painting techniques and fabric types require specific materials that work harmoniously together.
Fabric-specific paints are essential for achieving professional results. Look for acrylic fabric paints or textile paint mediums that provide excellent color retention and washability. These specialized paints are designed to penetrate fabric fibers and create a soft, flexible finish that will not crack or peel after drying. Learn more about painting techniques to enhance your understanding of material selection.
Invest in high-quality brushes with varying tip sizes. Synthetic brushes work best with fabric paints, offering precise control and smooth paint application. Flat brushes are ideal for broad coverage, while fine-tipped brushes allow intricate detailing. Consider purchasing a brush set that includes multiple sizes to give you flexibility during your creative process.
Fabric medium is a game-changing product that helps regular acrylic paints adhere better to textiles. When mixed with standard acrylic paint, it improves paint flexibility, prevents stiffening, and ensures your artwork remains soft and comfortable. A ratio of three parts paint to one part fabric medium typically provides optimal results.
Additional tools that can elevate your fabric painting experience include stencils, painter’s tape, textile markers, and fabric stabilizers. Stencils help create crisp, repeatable designs, while painter’s tape ensures clean edges and protects areas you do not want to paint. Textile markers can add fine details and outlines to your artwork.
Consider your fabric’s color and texture when selecting paint colors. Lighter fabrics provide a brighter canvas, while darker materials might require multiple paint layers or a white undercoat to ensure color vibrancy.
Key tools for fabric painting:
- Fabric-specific acrylic paints
- Synthetic brushes in various sizes
- Fabric medium
- Stencils and painter’s tape
- Textile markers
Remember that experimenting with different tools and techniques is part of the creative journey. Do not be afraid to test combinations and discover what works best for your unique artistic vision.
Step 4: Practice Your Painting Techniques
Mastering fabric painting requires patience, practice, and a willingness to experiment. Before diving into your final project, dedicating time to practicing techniques will significantly improve your artistic outcomes. Discover how painting enhances fine motor skills while developing your creative abilities.
Start with a practice fabric piece that matches the texture and weight of your intended project. Old t-shirts, cotton squares, or remnant fabric pieces work perfectly for technique trials. Prepare this practice fabric exactly as you would your final piece: wash, iron, and ensure a smooth surface for painting.
Begin by testing different brush strokes and paint application methods. Experiment with various techniques such as stippling (creating texture by dabbing the brush), dry brushing (using minimal paint for a textured effect), and blending colors directly on the fabric. Each technique produces unique visual effects and requires slightly different brush control.
Understand paint consistency is crucial. Too thick, and your paint will create stiff, cracking areas on the fabric. Too thin, and colors will appear washed out and lack vibrancy. Practice mixing your fabric paint with medium to achieve the right flow and consistency. A good rule of thumb is to aim for a texture similar to heavy cream.
Color blending on fabric requires a different approach compared to traditional canvas painting. Fabric absorbs paint differently, so practice creating gradual color transitions by working with slightly wet paint and using gentle, overlapping strokes. Allow each layer to partially dry before adding the next to prevent muddying your colors.
Pay attention to paint absorption rates. Different fabrics will respond uniquely to paint application. Cotton tends to absorb quickly, while synthetic blends might require more careful layering. Your practice sessions will help you understand how your chosen fabric interacts with paint.
Key practice techniques to master:
- Brush stroke variations
- Color blending methods
- Paint consistency control
- Understanding fabric absorption
- Layering and texture creation
Remember that every stroke is a learning opportunity. Do not be discouraged by initial imperfections. Each practice session brings you closer to creating stunning fabric art that reflects your unique creative vision.
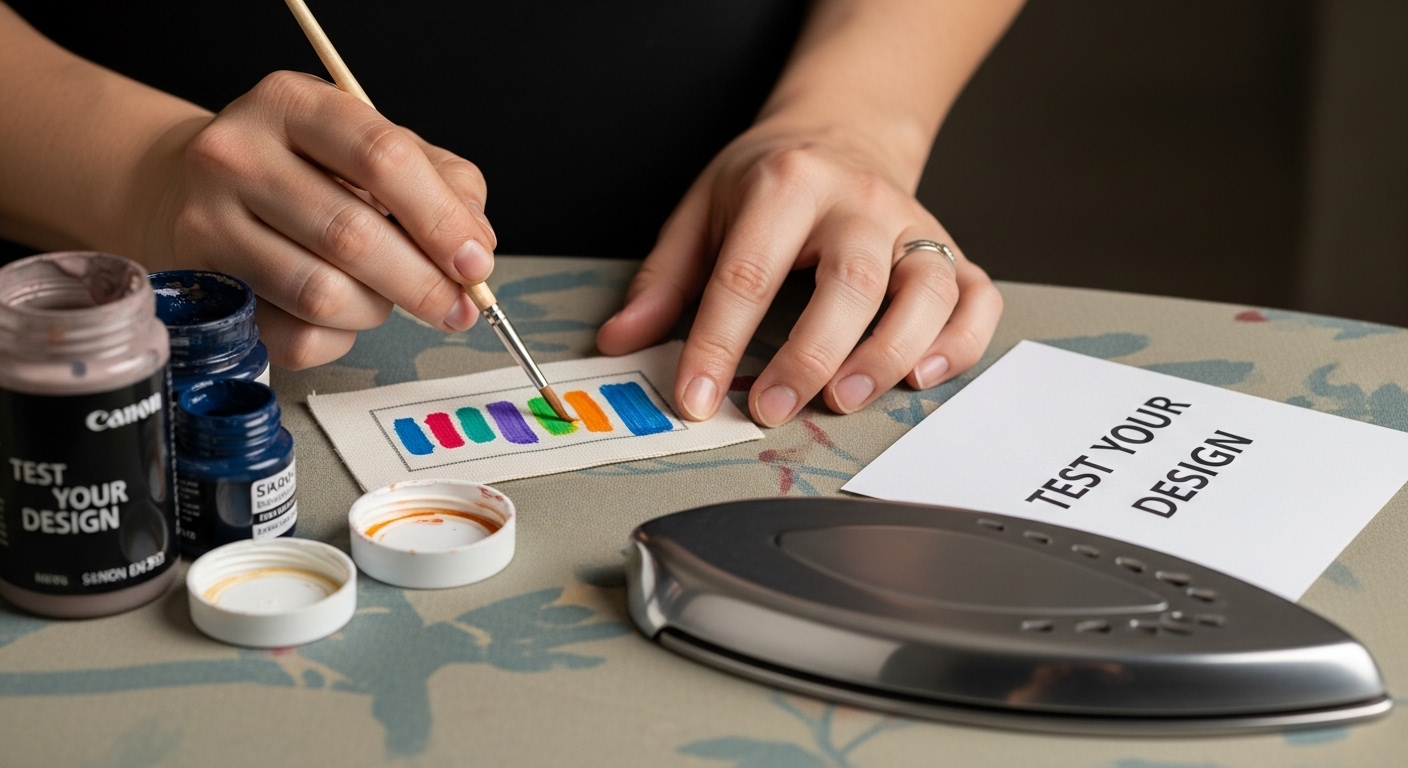
Step 5: Test Your Design on a Sample Fabric
Before committing to your final fabric painting project, conducting a comprehensive design test is crucial. This step allows you to validate your creative vision, assess paint performance, and identify potential challenges before investing time and resources into the main artwork. According to the Cape Peninsula University of Technology’s Fabric Knowledge Workshop, understanding fabric characteristics is fundamental to successful textile projects.
Select a sample fabric piece that closely matches your intended project’s material. Ideally, use a fabric remnant or a scrap piece from the same bolt of fabric you plan to use. This ensures your test results will be as accurate as possible. Prepare the sample fabric exactly as you would your final piece: wash, iron, and create a smooth, flat surface.
Transfer your design onto the sample fabric using your preferred method. Tracing techniques like carbon paper, stencils, or freehand drawing can help you reproduce your intended artwork. Take your time during this transfer process, ensuring precise lines and accurate proportions. Remember that small imperfections in the sample transfer can be magnified in the final piece.
Apply your selected fabric paints to the sample, mimicking the techniques and color combinations you plan to use in the final artwork. Pay close attention to paint absorption, color blending, and how different brush strokes interact with the fabric’s texture. Some fabrics might require multiple paint layers to achieve the desired vibrancy, while others could show color variations based on their weave or composition.
Test the paint’s durability and washability by creating a small test section. After the paint has completely dried, gently wash the sample fabric according to the paint manufacturer’s instructions. This will help you understand how well the colors hold up and whether any bleeding or fading occurs. Some fabric paints require heat setting with an iron to ensure long-lasting results.
Carefully document your observations during the testing process. Note paint consistency, color accuracy, fabric absorption rates, and any challenges you encounter. These insights will help you refine your technique and make necessary adjustments before starting your final project.
Key aspects to evaluate during sample testing:
- Paint color and vibrancy
- Design transfer accuracy
- Fabric absorption rates
- Color fastness after washing
- Paint flexibility and texture
Treating this sample test as a valuable learning experience will significantly improve the quality and success of your final fabric painting project.
Step 6: Heat-Set Your Artwork for Durability
Heat-setting is the critical final step that transforms your fabric painting from a delicate artwork into a washable, long-lasting piece. This process permanently bonds the paint to the fabric fibers, ensuring your creative effort remains vibrant and intact through multiple washes. According to the Craft and Design Institute, proper thermal transfer techniques are essential for maintaining textile design integrity.
Prepare your heat-setting equipment carefully. An iron is the most common tool for this process, but you will need to use it differently than for regular clothing. Set your iron to the highest heat setting recommended for your specific fabric type. Place a thin cotton cloth or parchment paper between the iron and your painted fabric to prevent direct heat contact that might damage your artwork.
Before heat-setting, ensure your painted fabric is completely dry. Wait at least 24 hours after painting to allow the colors to set naturally. This waiting period helps prevent smudging and ensures the paint has reached its initial stability. Cover your ironing board with a clean, light-colored towel to provide a smooth, protective surface that will not transfer additional colors or textures.
Apply consistent, firm pressure when heat-setting. Move the iron slowly across the painted surface, spending approximately 3-4 minutes on each section. Do not slide the iron, as this might smear your design. Instead, press down and lift, creating a stamping motion that distributes heat evenly. Pay extra attention to areas with multiple paint layers or intricate details.
For synthetic fabrics or delicate materials, consider using a heat press or following the specific manufacturer’s recommendations for your fabric paint. Some specialized fabric paints might require alternative heat-setting methods or specific temperature ranges. Always read the paint manufacturer’s instructions to ensure the best results.
After heat-setting, allow the fabric to cool completely before handling. This cooling period helps the paint molecules bond more effectively with the fabric fibers. To test the durability of your heat-set artwork, perform a gentle wash test using cold water and mild detergent.
Key heat-setting considerations:
- Use protective cloth between iron and artwork
- Apply consistent, firm pressure
- Move iron in press-and-lift motion
- Follow paint manufacturer’s specific instructions
- Allow fabric to cool completely after heat-setting
Remember that proper heat-setting is the final touch that transforms your fabric painting from a temporary creation to a cherished, washable piece of art.
Bring Your Fabric Art to Life with Trusted Supplies
Struggling to make colours pop or achieve a lasting finish on your fabric projects? Whether your challenge is finding the right fabric paint, needing reliable stencils for crisp designs, or making your painted creations truly washable, we understand how important professional results are. Your journey to stunning fabric art starts with choosing quality materials and tried-and-tested tools. At Blue Pea Online, you can discover South Africa’s largest collection of art supplies to help perfect every detail, from preparation to heat-setting.

Why wait to transform your creative ideas into beautiful fabric masterpieces? Visit Blue Pea Online for top-notch fabric paints, stencil kits, and everything you need for painting techniques that last. Shop today and make your next project a success from the very first brushstroke.
Frequently Asked Questions
What types of fabric are best for painting?
Natural fabrics like cotton, linen, and silk are ideal for fabric painting due to their superior paint absorption and durability. Synthetic blends, like polyester-cotton mixes, can also work but may require specific fabric painting mediums.
How do I prepare fabric for painting?
Before painting, wash the fabric to remove any sizing or residues, then iron it to create a smooth, flat surface. Avoid using fabric softeners, as they can create a barrier that prevents paint adherence.
What are the essential tools for fabric painting?
Key tools include fabric-specific paints, synthetic brushes of various sizes, fabric medium, stencils, painter’s tape, and textile markers. These tools enhance control, improve paint adhesion, and allow for detailed designs.
How do I ensure my fabric painting is durable?
Heat-setting your artwork with an iron is crucial. After painting, ensure it is completely dry for at least 24 hours, then use a protective cloth and apply consistent pressure with the iron to bond the paint to the fabric, making it washable and long-lasting.
